Beautiful

Love this time of year. Renewal & beautification at home and at the office. There’s nothing like all that fresh color popping up everywhere. Time to get your hands dirty!!!  :)))))))

Now that the doldrums of winter are behind us (please no more surprise storms) it’s time to turn to our gardens and and plan to put in some color to beautify our days. In full unabashed disclosure,  between Jackie and one of my daughters Michelle I never have to worry about what is going to be planted.  I am simply there as cheap labor and laughs!  I went online in search of the “New” Plants for ’22, and hit the jackpot with ideas from savvygardening.com.  Special thanks to Tara Nolan with her descriptions and introductions to new plants that come from an array of sources—trial garden visits, emails from growers and colleagues, presentations, seed and plant catalogs, along with her behind-the-scenes look at how growers come up with new plant introductions.  Be sure to write them down, and then go hunting at your nearby garden center.  I will say that later this year Jackie and I plan on visiting theBiltmore Estate which has some of the most beautiful gardens in the world!

When the weather is right, before you plant, here are some great “get ready” garden tips,:

1. Give your garden a ‘spring-clean’ – After the winter months, the garden will be in need of a good tidy-up. Sweep up dead leaves with a rake, pull out any weeds around the garden and borders, remove dead branches or plants and add these to your compost pile. In addition, late winter is the best time to prune (cutback) your plants and old flowers to remove any dead or diseased growth. Prune trees before they ‘leaf out’ to encourage new buds

2. Buy some summer-flowering bulbs and seeds – Now is the best time to order some summer-flowering bulbs which are ideal to plant in spring. Flowers such as lilies, dahlia and gladioli can be bought now to plant, and other seeds will benefit from being planted in pots indoors, before being transplanted into the soil. One can never have too many.

3. Prepare the soil – you need to get the soil ready in your garden beds. Your soil may be in poor condition due to frost from the winter, which makes it become compacted. In this case, you need to till or loosen the soil by turning it over with a tiller or spade. It’s advised to dig in a depth of 12-14 inches to work the soil and loosen it up. Add a fresh layer of mulch or compost to improve the surface of the bed.

4. Start your vegetable plot – If you want organic veggies, now is the right time to plant. Hardy vegetables such as potatoes, peas and some lettuces grow well in cool soil. Bear in mind, that as soon as your soil reaches 42-degrees Fahrenheit, you can start to sow directly outside. Other veggies you can sow include carrots, arugula, spinach, leeks and beetroots. By planting these vegetables now, they should be ready to eat by early summer.


Now, on to the show …

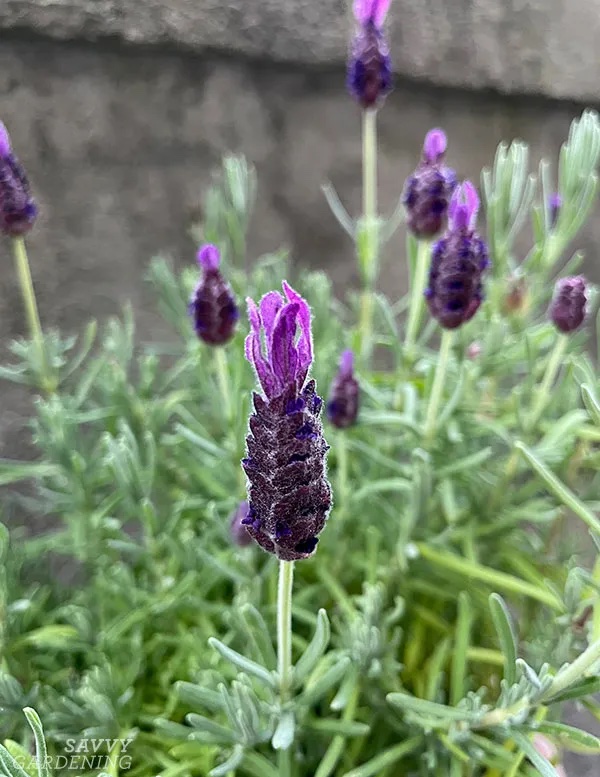
Spanish lavender (Lavandula stoechas) Primavera – I think this was my favorite new plant that I this year, probably because I planted it in my new favorite terracotta pot. I loved the flouncy blooms, or “flags” as they’re called, that wave above the flowers of ‘Primavera’ from Darwin Perennials. The blooms attract bees and butterflies, and the plant loved its sunny spot on my front porch area.


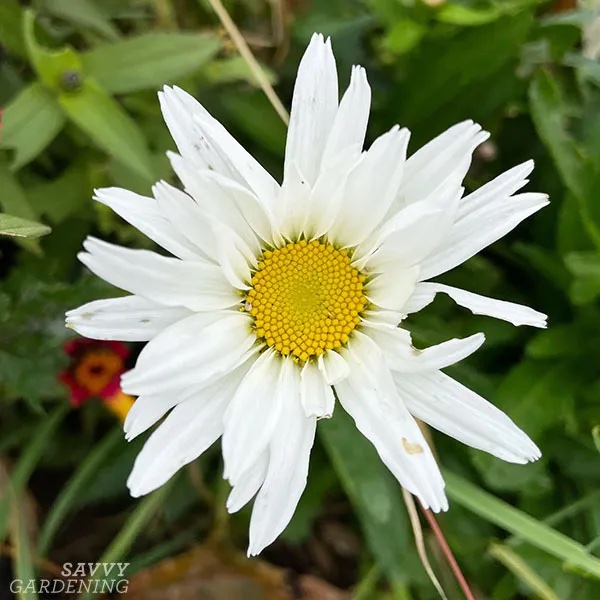
Leucanthemum ‘White Lion’ – This perennial beauty is called “the spring Shasta” on the grower’s website. Which means White Lion is a long-blooming, three-season perennial that will start its show in late spring. A new introduction from Kieft Seed, my two shasta daisy plants bloomed through the end of October in my front yard garden. Happy in full sun, it is hardy down to USDA zone 3b and extremely drought tolerant.


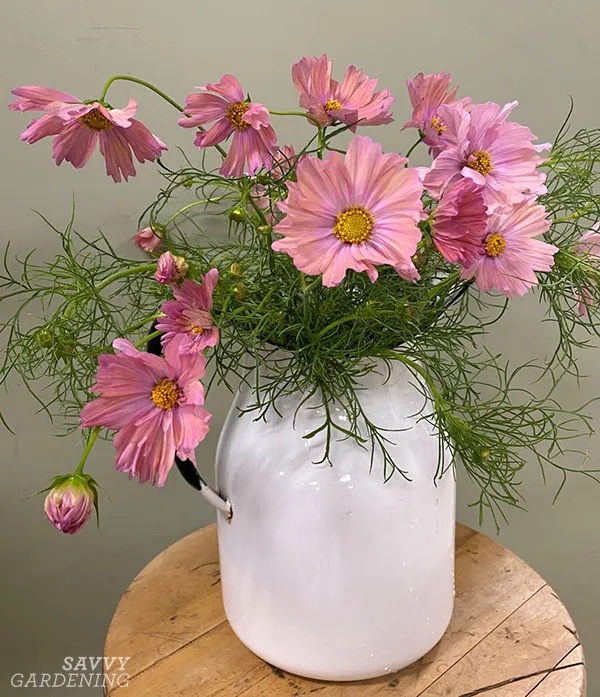
Cosmos ‘Apricotta’ – ‘Apricotta’, with its lush, pink flowers with hints of apricot and yellow are on my must-grow list. A new variety from William Dam Seeds, they will bloom through the first frost.


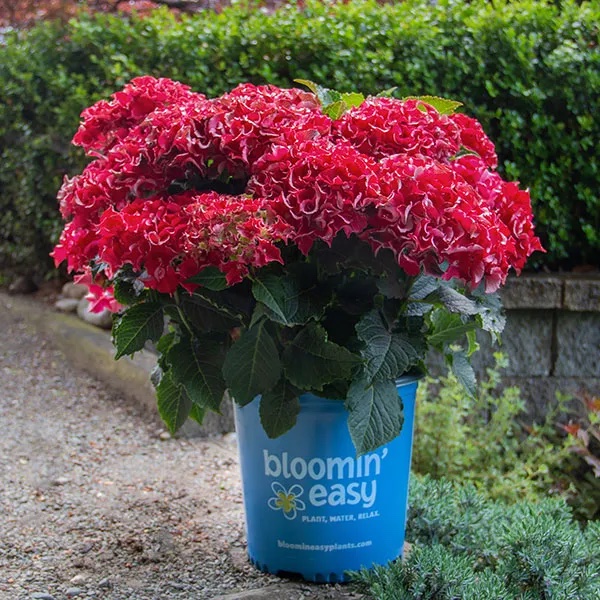
‘Frill Ride’ Bigleaf Hydrangea – I can never resist a ruffle or a frill, so out of all the new hydrangeas Bloomin’ Easy is releasing for 2022, I couldn’t resist ‘Frill Ride’. This big-leaf hydrangea features enormous deep-pink, frilly flowers. I imagine they’d look pretty stunning in a dried arrangement, too. This shrub is hardy down to zone 5 and prefers part sun (three to four hours a day of sun in the morning, with filtered sun the rest of the day). It grows to be about two to three feet tall and equally wide.


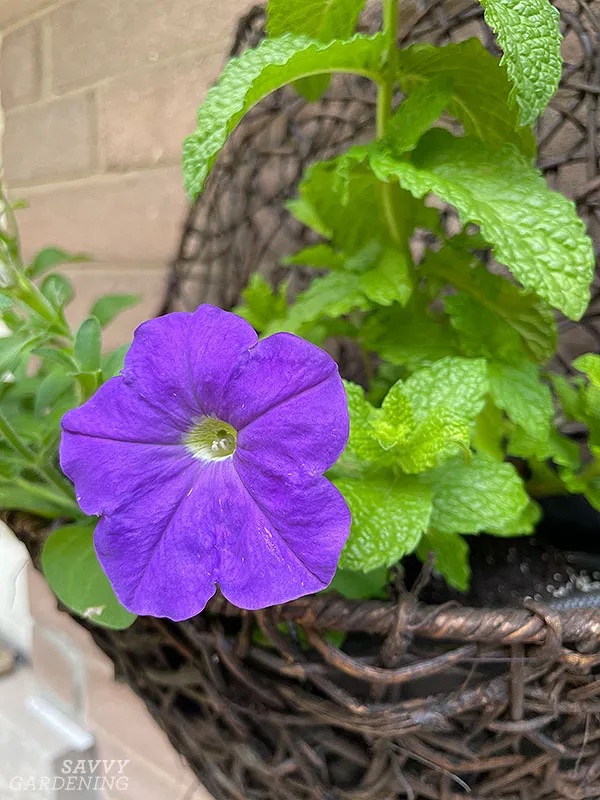
Easy Wave Sky Blue Spreading Petunia – Depending on the light, and I suppose, the plant (because sometimes certain growing conditions can affect the blooms), the Easy Wave Sky Blue petunia looks a lot like Very Peri, the Pantone Color of the Year. What I liked this plant was its contrast and slightly unusual blue-ish hue in a couple of my containers. The plants bloomed throughout the hot summer and into fall. They also spread nicely in a garden.


Suncredible Saturn Sunflower – This bright, cheerful Helianthus hybrid is everblooming, meaning season-long blooms. Part of the new Proven Winners lineup, the website suggests planting these as a living screen or along a fence. Plants reach up to three feet in height. Plants aren’t super fussy—they like rich soils but will grow in poorer soils. These drought-tolerant beauties also make great cut flowers and attract bees and butterflies.


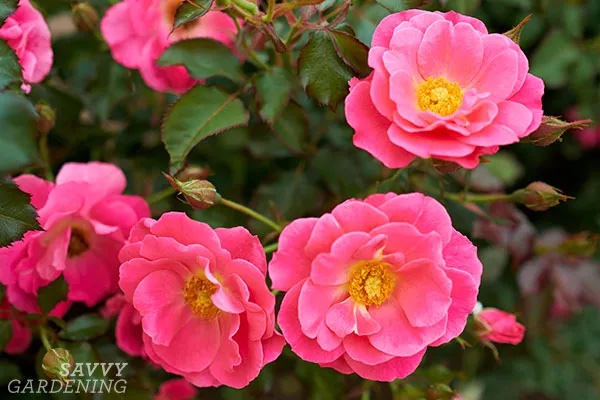
Aurora Borealis Rose – I love the advances that have been made in rose breeding over the last several years to create hardy roses that have greater pest and disease resistance. This new kid on the block, from Vineland’s 49th Parallel Collection was developed really close to my home, too. I feel a certain pride when I tell people about this compact shrub. Aurora Borealis is the third rose in this collection.


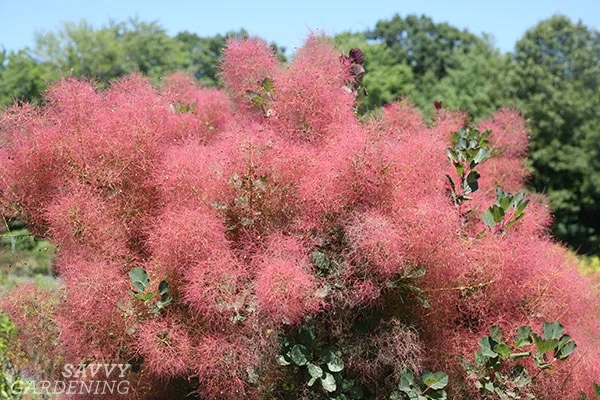
The Velvet Fog Smokebush – I have a thing for texture, so the fluffy, soft-looking plumes of smokebushes always catch my eye. This one is pretty spectacular and apparently grows more flowers than a conventional smokebush. Clouds of pinky-red seem to hover atop the blue-green foliage of this showy shrub. Mature plants range from 60 to 96 inches (152 to 244 cm) tall and should be planted in part sun to full sun.


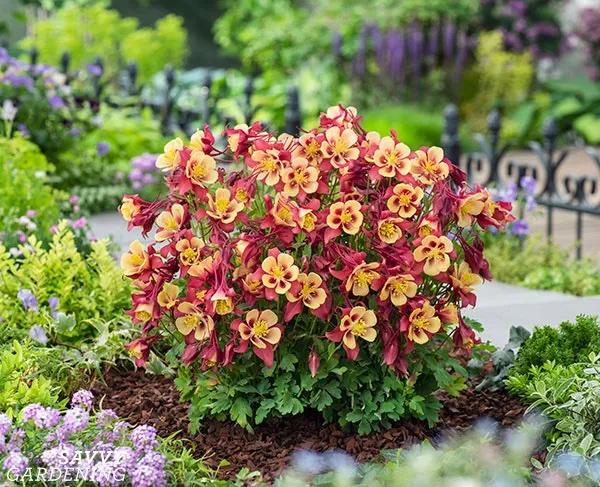
Aquilegia Earlybird – I don’t think I’ve even seen such a profusion of blooms all together in a columbine plant, in such a short little tidy clump. And you can see their faces! The blooms are so stunning, on all three from this series: Purple Yellow, Blue White, and Red Yellow. These plants are hardy down to zone 3a!


Visit https://savvygardening.com/new-plants/ to see dozens of more ideas to brighten up your garden this spring – and when things begin to bloom, be sure to send me a photo at skowalski@khtheat.com


::::::::::::::::::::::::::::::::::::::::::::::::::::::::::::::::::::::::::::::::::::::::::

DO YOU LIKE CONTESTS?
Me, too.

As you may know the Kowalski Heat Treating logo finds its way
into the visuals of my Friday posts.
I.  Love.  My.  Logo.
One week there could be three logos.
The next week there could be 15 logos.
And sometimes the logo is very small or just a partial logo showing.
But there are always logos in some of the pictures.
So, I challenge you, my beloved readers, to count them and send me a
quick email with the total number of logos in the Friday post.
On the following Tuesday I’ll pick a winner from the correct answers
and send that lucky person some great KHT swag.
So, start counting and good luck!  
Oh, and the logos at the very top header don’t count.
Got it? Good.  :-))))
Have fun!!

::::::::::::::::::::::::::::::::::::::::::::::::::::::::::::::::::::::::::::::::::::::::::

It’s Time to Make Amends?

(top)Get your dirt ready. (row 2 left) If your soil looks like this it might be too dry. (row 2 middle) If it looks like this it might not have enough drainage. (row 2 right) Getting the soil right promotes proper root development. (row 3 left) Getting the garden soil ready for planting is a family affair. (row 3 right) Worms are a gardeners soil helper. And bait for the fishermen in the family. (row 4 left) When you’ve done all you can do for your soil, plant away! (row 5 left) Enjoy your spring labor all summer long. 

Had enough of this cold weather? Yikes.  Even though I’m a proud Clevelander, and someone who LOVES to be outside in any weather, I am done with the cold weather blowing off of Lake Erie (it snowed this week, as I watched my beloved Indians play in Puerto Rico (87 degrees!).  To get out of my funk, one of my spring rituals is to join Jackie in prepping the gardens around the yard.  We hit the  garage, break out the tools, gloves and bags, get down on our hands and knees, soak in the warming sunshine (optimistic thoughts!) and get to work.  We start with the leftover hard to rake leaves, scattered unwanted debris, and then just dig into the soil, pulling what didn’t make it over the winter and begin visualizing just what we’ll plant this year.Doesn’t that sound good?  The reality is I am allowed to dig dirt and rake the leaves!  Jackie has the incredible gift of visualizing what needs to go where! Then the time arrives to “make amends.”  No, not the ones that come to mind (being a good Catholic boy like me, I am constantly working on those all year long) – more the garden type, specifically amending the soil.  So, for all my fellow weekend gardeners out there, here’s some great tips to get your soil ready for some great growing.  And for my “step by step” folks, see the top ten tips from rodalesorganiclife author Julie Moynahan.

For most gardeners, it is easy to take a patch of soil for granted and assume it has all of the components necessary for healthy plant growth. After assuming the soil is “good to grow”, gardeners simply visit the nursery, choose a kind of flower or vegetable crop they would like to grow this year, dig the hole, plant the crop, add a bit of water and hope for the best. In the case of excellent soil, the flower should grow healthily and beautifully. However, after a long time of using the same soil, to gain the most optimal growing environment for the plants, actions to improve the soil must be taken. This is considered “amending” your soil.
The first essential step to amend soil is to take a soil test to find out how quickly your soil drains. Try this:

  1. dig a few holes around your yard. It is recommended that these holes should be at least six inches wide and six inches deep.
  2. the day before you take your actual test, you saturate the holes with water, which will lead to a more accurate result. After all of the water has successfully drained, fill the holes with water again, making sure the bottoms of the holes are flat.
  3. After an hour, simply measure the water levels in the holes using a tape measure. What you are attempting to find out with this test is how rapidly the soil absorbs the water.  Now, take a close look:
  • If your soil absorbs less than a half of an inch water after an hour, your soil has a considerably poor quality of drainage.
  • If the water in the holes drains at a half inch after an hour, it means that your soil has a slow drainage; however, it is sufficient.
  • If the water drains from one to four inches in an hour, that is good news for you because most kinds of plants and flowers can do well in this soil condition.
  • If the water drains at a rate of more than four inches within an hour, the soil is considered to be quick draining. It is recommended that the water level should be definitely drained out of the hole from four to six hours because this amount of water is ideal for your soil. However, if the drainage lasts more than eight hours, it is difficult to grow any different kinds of flowers or plants.

If your soil has poor drainage, it likely consists of a lot of clay or has too much sand mixed in. Northeast Ohio is famous for its clay base.  You’ll be required to add more organic matter to the soil (or opt for a container garden instead) if your soil is too far gone. Don’t worry, it can take years to get your dirt just right!

Once you’ve determined your soil is good enough for planting, the next step is to remove any existing vegetation (weeds or grass) from the soil.. You can also smother the area with dark cloth prior to planting, which also kills off a lot of vegetation.  (this step is essential because you have to be sure that there are no weeds or grasses growing where you intend to grow). Jackie likes to use PREEN.

The best soil amendments for your plants consist of organic or inorganic fertilizers, as well as other soil amendment ingredients like compost. The three vital factors found in most chemical fertilizers are nitrogen, phosphorous, and potassium (N-P-K). Always pay attention to the N-P-K ratings on fertilizer packaging so as to get the proper combination in your soil. (to learn more, visit A Beginner’s Guide to Reading Fertilizer Labels).

It is undeniable that mulching can bring many benefits for your garden. In reality, not only does it add an attractive perfect look to your garden or yard, but it also helps keep weeds at bay as well as retain moisture. One thing you have to make sure of is not to lay mulch too thick. For finer mulch  2 inches is plenty, more than that and your plants won’t appreciate it!
To be sure your soil is “ready” you can send it to a lab or testing facility.  When you send a soil sample to a lab, you get a detailed analysis of soil nutrients and you find out about deficiencies. Here’s a link for my Cleveland diggers: http://www.cuyahogaswcd.org/resources/soil-maps-and-testing.  And here’s a “top ten” checklist to follow:

1. SOIL STRUCTURE AND TILTH – When the soil is neither too wet nor too dry, dig a hole 6 to10 inches deep. Separate an intact section about the size of a soup can and break it apart with your fingers. Determine whether the soil is cloddy, powdery, or granular. Ideally, your soil should be made up of different sized crumbs that will hold their shape under slight pressure. Crumbs, or aggregates, as soil scientists call them, that break apart only with difficulty mean your soil is too hard.

Why It’s Important – “Soil rich in organic matter tends to form relatively round aggregates, which leads to porosity,” says Tom Thompson, Ph.D., a professor of soil science, at the University of Arizona. Open, porous soils allow the free movement of water and oxygen, he explains, so plants can develop strong, healthy roots.

2. COMPACTION – Plunge a wire flag vertically into the soil at different locations. Mark the depth at which the wire bends. The sooner it bends, the more compacted the soil. A foot or more of easily penetrable soil is ideal.
Why It’s Important– Compacted soil inhibits root growth and water availability and keeps earthworms and other vital soil fauna from circulating freely.

3. WORKABILITY – You may have already learned about your soil’s workability the last time you got the garden ready for planting. If tilling or digging the soil produces cloddy or plate-like clumps, the workability is low. Farmers measure workability by monitoring how much tractor fuel they use; you can simply judge the effort necessary to prepare beds for planting.
Why It’s Important – Soil that’s easy to work allows water to reach roots efficiently and is less prone to compaction. Fail this step, and your garden will likely show disappointing results for many of the other tests. “If the soil isn’t easily worked, other problems have already been going on for a while,” says Raymond Allmaras, a soil specialist with the USDA’s Agricultural Research Service in St. Paul, Minnesota.

4. SOIL ORGANISMS – Measure the animal life in your soil by digging down at least 6 inches and peering intently into the hole for 4 minutes. Tick off the number and species of each organism observed, such as centipedes, ground beetles, and spiders. Because most soil organisms spurn daylight, gently probe the soil to unearth the shy residents. If you count less than 10, your soil does not have enough active players in the food chain.
Why It’s Important– A thriving population of diverse fungi, bacteria, insects, and invertebrates is one of the most visible signs of soil quality. The more that creeps and crawls under your garden, the less opportunity there is for pests and disease.  Each level of soil life does its part to break down plant residue and make more nutrients available for plant growth. Although this might be recommended, in full disclosure I hate creepy-crawly bugs especially spiders!

5. EARTHWORMS – When the soil is not too dry or wet, examine the soil surface for earthworm casts and/or burrows. Then dig out 6 inches of soil and count the number of earthworms squirming on the shovel. Three worms are good; five are better. The absence of worms means the soil does not have enough of the organic matter they feed on.
Why It’s Important– Not only do earthworms aerate the soil, but their casts infuse the soil with enzymes, bacteria, organic matter, and plant nutrients. They also increase water infiltration and secrete compounds that bind soil particles together for better tilth. As an added benefit, lots of earthworms work well if you are a fisherman!

6. PLANT RESIDUE – If you’ve grown a cover crop, dig down 6 inches 1 month after turning it into the soil and then look for plant matter. The range of organic material is important to notice here. The presence of recognizable plant parts as well as plant fibers and darkly colored humus indicates an ideal rate of decomposition.
Why It’s Important– “The single most important component of healthy soil is organic matter,” Thompson says. But plants and other organic materials decompose only when soil organisms are there to do the work. Any sign of this process is a good sign, but the speed of decomposition is important, too. Fast decomposition is another indicator of soil quality. In poorly aerated soil, plants break down slowly, a condition that gives off a faintly sour scent.

7. PLANT VIGOR – Start this test during the active growing season and look for healthy plant color and size that’s relatively uniform. Overall health and development must be judged for what’s considered normal for your region. One caveat: If you planted late or during a drought, or suffered a pest infestation, results of this test may be unreliable.
Why It’s Important– Plant vigor indicates soil with good structure and tilth, a well-regulated water supply, and a diverse population of organisms. It’s the best sign of effective soil management you’ll have above ground.

8. ROOT DEVELOPMENT – Use a shovel or hand trowel to dig gently around a selected plant, preferably a weed you won’t miss. Once you’ve reached root depth, pull an annual plant up and check the extent of root development, searching for fine strands with a white healthy appearance. Brown, mushy roots indicate serious drainage problems—and a poor outlook for this year’s harvest. Stunted roots might also indicate disease or the presence of root-gnawing pests. “When you look at the roots, you can really see what’s going on,” Allmaras says.
Why It’s Important– Roots have the most immediate connection with and reliance on soil quality. Without air, water, biological activity, and crumbly soil to grow in, roots can’t do their job.

9. WATER INFILTRATION – Take an empty coffee can with the bottom removed and push it into the soil until just 3 inches remain above the surface. Fill the can with water, marking the water height, and then time how long it takes for the water to be absorbed into the soil. Repeat this several times until the rate of absorption slows and your times become consistent. Anything slower than 1/2 to 1 inch per hour is an indication of compacted soil.
Why It’s Important– Good infiltration gets water to plants where they need it—at their roots—prevents runoff and erosion, and lets air move more efficiently into soil pores.

10. WATER AVAILABILITY – Wait for a soaking rain; then record how long until plants start to show signs of thirst. Results will vary widely by region. The basic lesson is that if plants require more frequent watering than typical for your region, your soil is probably the culprit.
Why It’s Important– Porous soil can better resist evaporation and adequately supply plants between waterings. “It could make all the difference in the world if water were to go another inch deeper,” Allmaras says.

Once you’ve amended your soil, plant away, and be sure to send me a photo of your results so that we can post onto our website.

BONUS POST:  
https://www.provenwinners.com/sites/provenwinners.com/files/catalogs_pdfs/proven_winners_annuals_by_region.pdf