Poor Old Jack
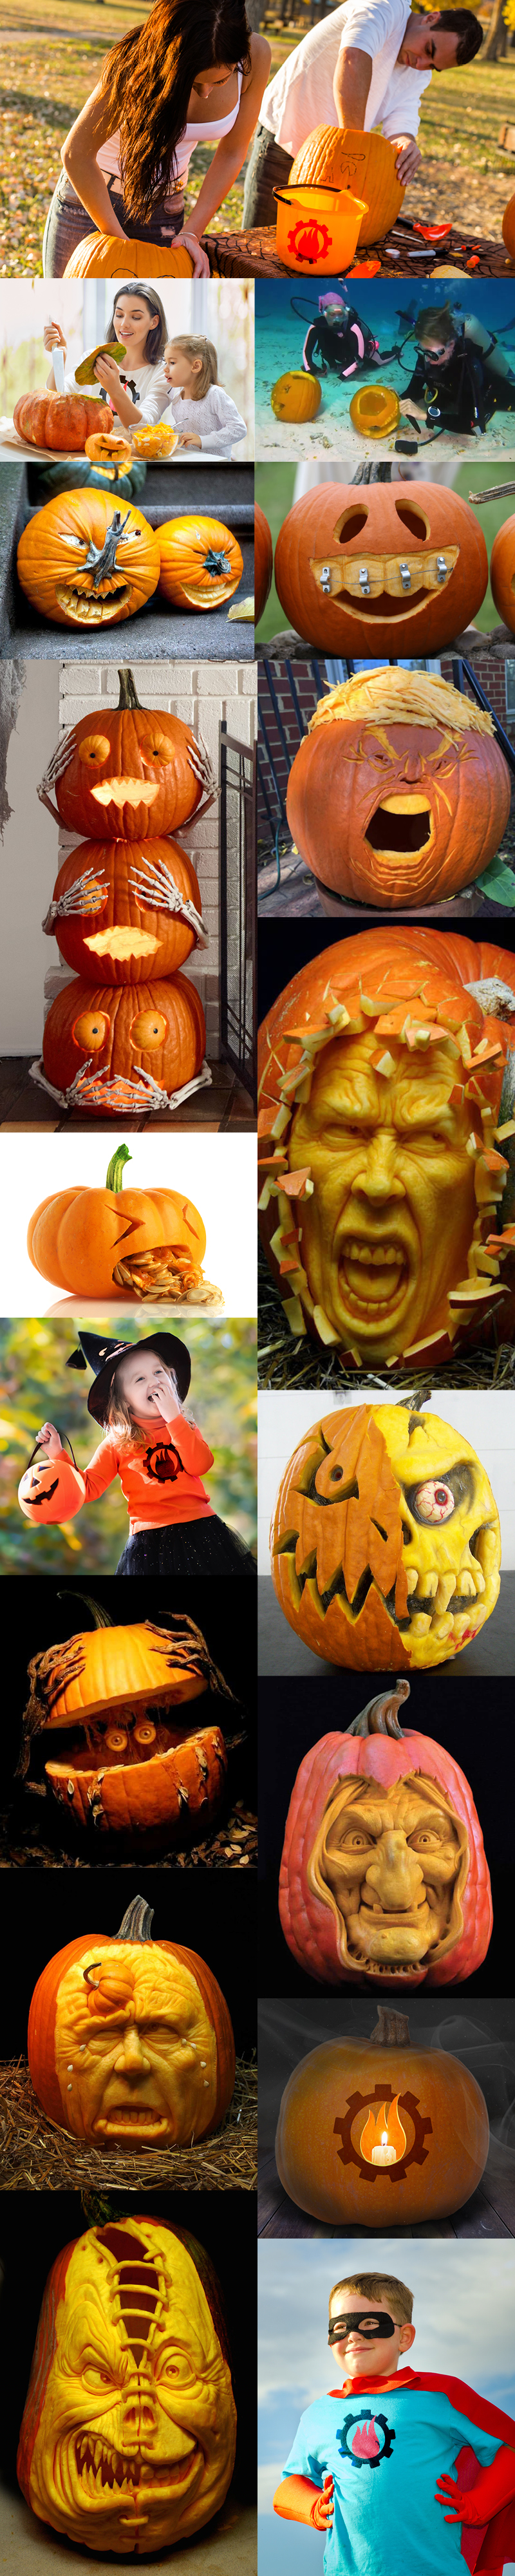
It’s that time, folks! Get out your tools and start carving your pumpkins. Doing it outside is a good idea but the weather might keep you in. There’s one couple in the third photo at the top who thought it’d be a good idea to carve theirs under water. Makes for easy clean-up. No matter what your skill level, it’s really fun to create your very own jack-o-lantern. I have to say, there are some really clever and talented pumpkin carvers out there.
Traditions. Memories and family fun. Does it get much better than everyone around the table carving pumpkins? It’s one of my favorites! Growing up, all of my brothers and sisters would be working on carving the pumpkins together, you can only imagine the amount of pumpkin goo and seeds flying around everywhere. It took us as long to clean up the kitchen and dining room as it did to carve the pumpkins. As my own daughters got older, they all came to appreciate my sense of style, especially when using the power tools to REALLY carve the pumpkins. For some unknown reason I have never won any best pumpkin carving awards! I went on line to get some really fun images and ideas to inspire you – for more, just type in great pumpkin carving ideas, and dozens of websites will pop up. Here’s just a bit of trivia on Old Jack himself, and some practical guidelines to make your carving time fun, efficient and not too messy. Thanks to kitchn.com, pumpkinnook.com and jessicagavin for the info. Enjoy, and send me photos of your masterpieces!
The Irish brought the tradition of carving pumpkins into Jack O’Lantern to America. But, the original Jack O’Lantern was not a pumpkin. Pumpkins did not exist in Ireland. Ancient Celtic cultures in Ireland carved turnips on All Hallow’s Eve, and placed an ember in them, to ward off evil spirits.
The Tale of Stingy Jack and the Jack O’ Lantern goes back hundreds of years in Irish History. Many of the stories, center round Stingy Jack. Here’s the most popular story:
Stingy Jack was a miserable, old man who took pleasure in playing tricks on just about everyone: family, friends, his mother and even the Devil himself. One day, he tricked the Devil into climbing up an apple tree. After the Devil climbed up the tree, Stingy Jack hurriedly placed crosses around the trunk of the tree. Unable to touch a cross, the Devil was stuck in the tree. Stingy Jack made the Devil promise him not to take his soul when he died. Once the devil promised not to take his soul, Stingy Jack removed the crosses, and the Devil climbed down out of the apple tree.
Many years later, Jack died, he went to the pearly gates of Heaven and was told by Saint Peter that he was mean and cruel, and had led a miserable, worthless life on earth. Stingy Jack was not allowed to enter heaven. He then went down to Hell and the Devil. The Devil kept his promise and would not allow him to enter Hell. Now Jack was scared. He had nowhere to go, but to wander about forever in the dark Netherworld between heaven and hell. He asked the Devil how he could leave, as there was no light. The Devil tossed him an ember from the flames of Hell, to help Stingy Jack light his way. Jack had a Turnip with him. It was one of his favorite foods, and he always carried one with him. Jack hollowed out the Turnip, and placed the ember the Devil had given him, inside the turnip. From that day onward, Stingy Jack roamed the earth without a resting place, lighting his way as he went with his “Jack O’Lantern”.
On all Hallow’s eve, the Irish hollowed out Turnips, rutabagas, gourds, potatoes and beets. They placed a light in them to ward off evil spirits and keep Stingy Jack away. These were the original Jack O’Lanterns. In the 1800’s a couple of waves of Irish immigrants came to America. The Irish immigrants quickly discovered that Pumpkins were bigger and easier to carve out. So they used pumpkins for Jack O’Lanterns.
What Variety of Pumpkin Should I Choose?
If you’re looking for specific varieties to hunt for, the ladies of The Peterson Sisters Pumpkin Patch suggest the Hobbit pumpkin, especially popular on the West Coast, or the Autumn Gold. Hobbits are 10- to 12-pound pumpkins and are considered a medium-sized variety. Autumn Golds are a very manageable variety, weighing between seven and 10 pounds. They turn a beautiful golden-orange color before fully ripe and are easy to carve, compared to other varieties.
Christy Lehner of Lehner’s Pumpkin Farm in Radnor, OH, says that the Gold Rush and Wolf varieties are popular for people who want larger jack-o’-lanterns. Both of these types of pumpkins weigh between 15 to 35 pounds, although they’re not necessarily the easiest to carve. If you’re looking for a statement-making pumpkin and aren’t afraid of using a little elbow grease, give one of these a try.
How to Pick a Pumpkin for Carving:
1. Pick it up and tap it: It should feel sturdy. When you tap it, you should hear a hollow sound.
2. Check the coloring: Choose one that has consistent coloring throughout.
3. Look for bad spots: Try to choose a pumpkin without any scratches, bruises, or dark spots.
4. Apply pressure: Flip the pumpkin upside down and apply pressure with your thumbs. If it’s not completely sturdy, the pumpkin isn’t fresh and will rot quickly.
5. Set it down: Make sure it sits flat! (Unless you want your jack-o’-lantern to sit a little crooked.) Imagine which side will be the front facing one with your decoration.
6. Be sure to carry it from the bottom: Don’t carry it by the stem — instead, cradle it from the bottom or tote it home in a bag.
Foolproof Method to Carve a Pumpkin
Carving a pumpkin isn’t rocket science, but it’s still wise to have a game plan. Before you lop off the top of that pumpkin and grab a handful of gooey squash guts, take a look through our basic guide to carving the best Halloween pumpkin. Follow these steps and you’ll end up with a cute and classic jack-o’-lantern with easy, no-fuss cleanup afterwards.
1. First rule of pumpkin carving: Do it somewhere you don’t mind getting messy, ideally outdoors. Line your work surface (a sturdy table or the ground) with something you’ll throw away later — like butcher paper, newsprint, or flattened brown paper grocery bags. If using the latter, simply cut down one side of the grocery bag, then cut off the base of the bag so you have a big rectangle of brown paper. Layer a few of these on the table and you’re good to go.
2. Once you’ve got your work surface ready, it’s time to assemble the proper tools. You can totally get a pumpkin carving kit from your local drugstore, supermarket, or Halloween pop-up shop. Or you can use a few tools from your kitchen. Make sure you have everything ready so you don’t have to traipse back through your kitchen with pumpkin-gut-covered hands. Two key tools for carving include a good cook 4.5-Inch vegetable knife and a strong ladle/spoon for scooping. For more elaborate carvings, many creative designers add in an electric drill and multiple smaller carving knives and an X-ACTO knife.
3. Draw Before You Carve – In addition to your carving tools, you’ll need a pen for drawing your design onto the pumpkin, and couple big bowls — one for the seeds (the best part of pumpkin carving!) and one for the rest of the pumpkin goo and throwaway bits leftover from carving.
Whatever you do, save those pumpkin seeds! They’re so, so good roasted simply with oil and salt. It’s not hard, but here’s a link to a simple recipe.
Step By Step Instructions:
- Set up your workspace: Line a sturdy table with flattened grocery bags, newsprint, or butcher paper. Have your permanent marker, carving tools, and bowls nearby.
- Draw your design: After you’ve determined the best side of your pumpkin for a face, use the permanent marker to sketch out eyes, a nose, and a toothy grin.
- Draw your lid: Outline a circular lid around the pumpkin stem, about 5 to 6 inches in diameter. Add a notch in the back if you like — this makes it easier to line up.
- Cut out the pumpkin lid: With a slim pumpkin carving knife (the carving tool with a toothed blade like a mini-saw) or serrated knife, cut along the outline of your pumpkin lid. Make sure you slice through the pumpkin at a 45-degree inward angle, so you’ll be able to replace the lid without it falling in.
- Remove the pumpkin seeds: The seeds are all attached to the pumpkin and each other by thin strings. Grab the big bunches of seeds with your hands and place them in one of the bowls, to be cleaned later.
- Scoop out the insides of the pumpkin: Using a ladle or the scraper that came with your kit (or a metal spoon if you don’t have this tool), clean out the inside of the pumpkin until no stringy bits remain. Discard the pumpkin guts in the second bowl.
- Wipe off the pumpkin: Use the kitchen towel to wipe off the outside of the pumpkin so that it will be easier and safer to carve.
- Cut out the design: Make straight cuts into your pumpkin along the lines of your design, removing the pieces and discarding them in the refuse bowl.
- Clean up the details: Go back in and scrape out any stringy pieces or jagged lines with an X-ACTO knife or the wire tool from your carving kit. You can also scrape off the marker lines while you’re at it, though they won’t be visible in the darkness of night.
- Light your pumpkin: Insert a tea light candle in the bottom of your pumpkin. Use a long match or lighter to light the pumpkin and replace the lid. Tip: If you’re having trouble lighting the candle, try going through the mouth of the jack-o’-lantern instead of the top.
- Make roasted pumpkin seeds: Clean and dry the pumpkin seeds, then toss with oil, salt, and any desired seasonings, and roast in a low oven until golden brown.


Leave a Reply
Want to join the discussion?Feel free to contribute!